Computing Club Tutorial - Entity Component System (ECS)
Table of Contents
We’re going to be creating a 2D, top-down, tile-based game demo using p5js.
What is ECS?
The Entity-Component-System (ECS) design pattern is a lovely pattern for managing a lot of disparate types of things in your game. Specifically, you might want to define characters that move, characters that don’t move, items, items that hurt you, items that talk to you, NPCs, enemies of varying type, etc.
The nice thing is that those all typically derive from the same base class. They all need a position and a sprite, for example. Essentially, we’ll define an Entity class and inherit from that for all our varying types.
We may also want to give them different abilities/characteristics. Enter components – the tl;dr is that you will “equip” an entity with a certain component, and that entity will then check its list of components for its abilities.
This is a fairly reductive take on ECS and you can read about it in-depth on Wikipedia and dev.to and this blog.
There also is an ECS framework available as well: FLECS and a correlated FAQ.
ECS, c/o WikiPedia:

A note on resources
Until you’re ready to hire an artist, use royalty/copyright-free resources. There are a lot available online, from itch.io to opengameart to (my favorite) kenney.nl.
Whatever you do though:
- Avoid using copyrighted images (unless if you paid for it)
- Include the license every time you use a resource, and check the attribution requirements for the original file
- Avoid using AI-generated artwork - hire an artist
- Since we’re using p5js you’ll want to become familiar with their documentation. There are a large number of resources, tutorials, libraries, and well-written API documentation pages on their site: https://p5js.org/reference/.
Setup
- Create an account on the p5js editor: p5js online editor - I’ve linked my GitHub to it for ease of sign in, however you can use whatever method you prefer.
- Grab a spritesheet from kenney.nl: I’ll be using the microrogue resource. Make sure you include the License when you upload!
- Double-note - we’re using the “packed” sprite sheet, not individual images! Both have pros and cons, however uploading hundreds of images to the online editor doesn’t work very well. The non-packed sheet adds a gutter in between images - great for slicing up in something like Tiled or Godot but not as easy to use when calculating based on pixel size (though, to be fair it would just be an offset – we’ll get there).
First steps
Ok, here we go! Everything we’ll be doing is in the online p5js editor, however you can export it to any website you want after we’re done.
1. Create a new project (directory structure)
Let’s start by defining a directory structure. By default you’ll have some p5 libraries, an index.html, and a sketch.js.
If you aren’t familiar:
- Any time we add a new
jsfile we need to link to it within theindex.htmlfile - before we include thesketch.jsfile. HTML/JavaScript is (typically) rendered in-order, so dependencies must be specified in the correct order. - p5js uses a few functions to set things up:
-
setupruns before thedrawcycle (or, the forever loop). Set variable states and do all of your setup in this function. With p5js 2.0 and beyond, all file loading happens insetupas well! -
drawis your forever loop - it runs either as fast as possible or at a specified frame rate.
-
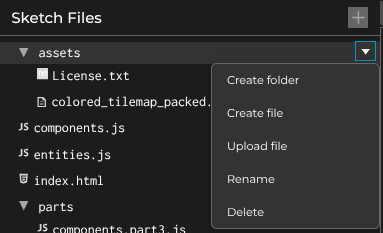
2. Upload your asset files and create empty files
Create a directory on the side called assets and upload your spritesheet and its license file. While you’re working there, create files named components.js and entities.js at the root of your directory (we could add sub-folders for organization, but for this we’ll just keep it on the same level).
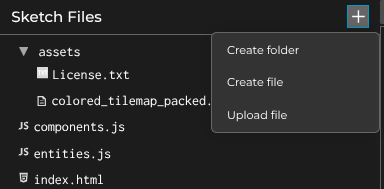
Note - if you want to upload to a folder then you need to hover over it and click the little dropdown triangle to the side, otherwise you upload to the root of the structure.
3. Wire everything up
In your index.html file, add the following lines above the call to include sketch.js (I’m including sketch.js here to show where to go - don’t double-include it!):
<script src="components.js"></script>
<script src="entities.js"></script>
<script src="sketch.js"></script>
We need to put them above as they need to be parsed before sketch.js is parsed (for instance, any global variables we might want to share).
Note that we are setting up a structure that is good for a quick demo - it would be much better to refactor our code to say, have a
Gameclass controlling everything, ingesting the assets, managing entities, etc. However, we’re going to just use a few global variables to get things working.
4. Use p5js 2.0.x
Let’s start you off with the latest version of p5js - click the version number (next to the gear icon) in the top right and select the latest 2.0.x version - I’m on 2.0.5. This introduces a plethora of new features - the ones I’m most familiar with are that assets are now loaded in via async/await calls (instead of using a preload function). Let’s try it out:
At the top of your sketch.js file (in global space), add a variable:
let spritesheet;

...

function setup() {
  ...
And then modify your setup and draw functions to look like this:
async function setup() {
  // load in sprite sheet - change the filename to match your file
  // mine is colored_tilemap_packed.png
  spritesheet = await loadImage("assets/spritesheet.png");
  createCanvas(400, 400);
}

function draw() {
  background(0);
  image(spritesheet, 0, 0);
}
You should now see your spritesheet being drawn to the top left corner! Note that we also draw the background to give the illusion of animation (once things start to move). If you didn’t redraw the background then things would smear the screen.
![]()
5. Draw your character to the screen
In the global space create an object for a character - eventually we’ll replace it with a class, however for now it’ll just keep an eye on the location:
let spritesheet;
let player;

...

async function setup() {
  ...

  player = {x: 20, y: 20};

  ...
}
This gives our player a position in 2D space - note that the origin is at the top left corner (and all images/rectanges are drawn with their respective top left corners as the origin).
You can test this out by the way, when drawing the spritesheet you can use the player position:
image(spritesheet, player.x, player.y);
However, we want to draw a single sprite from our spritesheet, not the entirety of it.
There are different approaches to loading sprites - we’re doing it the ‘low-impact’ way where we only load in a single image, rather than hundreds. This has the benefit of saving memory (1 image vs. hundreds) at the cost of a slight bit of complexity.
We need to add a helper function and some information to draw a single sprite. What we will do is add a variable to tell us the width and height of a sprite (they should all be the same size in your spritesheets - some of the more complicated ones use varying sizes and that can be a pain to manually calculate).
Note - if you’re using a different spritesheet, check the documentation inside for how large a sprite is.
At the top of sketch.js add the following (using your sprite size):
const SPRITE_SIZE  = 8; // size of sprite in spritesheet
const SPRITE_SCALE = 4; // amount to scale base sprite
let SPRITE_SCALED  = 1; // calculated scale value
What going to do is use the SPRITE_SIZE variable to calculate where in the sprite sheet our desired image is located, and then scale it up when drawing so it isn’t tiny.
Inside setup() make sure you calculate SPRITE_SCALED:
async function setup() {
  ...

  SPRITE_SCALED = SPRITE_SCALE * SPRITE_SIZE;

  ...
}
Add the following to the bottom of your sketch.js:
// utility function for drawing a single sprite from the spritesheet
// note: assumes using the 'packed' version (no spaces/gutters)
function drawSprite(sprite_id, x, y) {
  image(
    spritesheet,   // spritesheet object
    x,             // x location to draw on screen
    y,             // y location to draw on screen
    SPRITE_SCALED, // the **new** width of the sprite
    SPRITE_SCALED, // the **new** height of the sprite
    sprite_dict[sprite_id].c * SPRITE_SIZE, // its x location in the spritesheet
    sprite_dict[sprite_id].r * SPRITE_SIZE, // its y location in the spritesheet
    SPRITE_SIZE,   // the **original** width of the sprite
    SPRITE_SIZE    // the **original** height of the sprite
  );
}
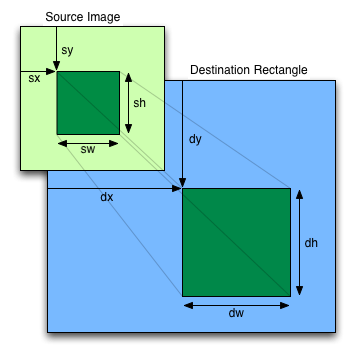
This uses the extended syntax of the image() function (see https://p5js.org/reference/p5/image/), however to explain what is going on:
image(img, dx, dy, dWidth, dHeight, sx, sy, [sWidth], [sHeight], [fit], [xAlign], [yAlign])
HOWEVER, we have an undefined variable! We need to create a lookup table so that we define which row and column a specific sprite is!
At the top:
let sprite_dict = {
  player:   { r: 0, c: 4 },
  npc:      { r: 0, c: 5 },
  beholder: { r: 0, c: 13 },
  snake:    { r: 1, c: 4 },
};
This defines a dictionary for every single character in our game. Some spritesheets come with a json file for easy unpacking, however these ones don’t. Gives you a bit more control!
Now draw the player:
drawSprite('player', player.x, player.y);
Feel free to pick whatever sprites you want for the various characters we’ll be drawing.
Another note:
All of your errors will go to your browser console! Pop open the dev tools and keep an eye on the console to see your typos/errors/etc.
You may have noticed things don’t look … great. That’s because we’re scaling a small image up and its edges are supposed to be nice and crisp.

Last but not least, we need to direct the canvas to be optimized for pixel art. If you look at the p5js documentation there are smooth() and noSmooth() functions, however they don’t seem to have the desired effect (note: I don’t know why).
After your call to createCanvas(400, 400) add the following:
async function setup() {
  // load in sprite sheet - change the filename to match your file
  await loadImage("assets/spritesheet.png");
  createCanvas(400, 400);

  drawingContext.imageSmoothingEnabled = false;

  ...

}
The image should be a bit crisper now.

6. Move them around
We have the ability to draw sprites and they should look crisp. Let’s now move our player around the screen.
Before we get into it, you might notice your background doesn’t match mine. That’s because I told you to use 0 (black), however the sprite background is somewhat gray (if you’re using the microroguelike one).
What you need to do is figure out what the color of your sprite background is and set the color each draw cycle to that! (If the sprites have a transparent background you don’t need to worry about this - and in the olden days we used to filter based on a magic color: #ff00ff).
For me, it is #222323, so at the top:
const sprite_bg = "#222323";
and then in draw:
function draw() {
  background(sprite_bg);

  ...
}
Ok, fun time - p5js handles keypresses in an interesting fashion. You can use the keyPressed function, the isKeyPressed function (within draw), and so on. Since we’re going for a game where the user can hold down keys, we’ll use the isKeyPressed approach.
At the bottom of draw (i.e., let’s handle player input after updating/drawing the game state):
function draw() {

  ...

  // enable continuous movement
  if (keyIsDown(LEFT_ARROW) || keyIsDown("a")) {
    player.x--;
  }
  if (keyIsDown(RIGHT_ARROW) || keyIsDown("d")) {
    player.x++;
  }
  if (keyIsDown(UP_ARROW) || keyIsDown("w")) {
    player.y--;
  }
  if (keyIsDown(DOWN_ARROW) || keyIsDown("s")) {
    player.y++;
  }
}
Here we’re using the arrow or WADS keys for movement. You can define whichever keys you want to use (or gamepads, for instance).
Note: again, there are nicer ways of doing this. Defining a lookup table of keys, for example, so that you can easily have your users configure their controls…
Your player should now move around the screen, a little bit at a time. You can play with the increment/decrement values to make it faster, however we’ll bake that into our Entity later on.
Note: at this point, you can define any number of sprites on the screen - for example:
drawSprite('snake', 100, 100);Also, if you want to see the screen smearing example then comment out the call to
backgroundwithin thedrawloop.
If you ran into issues or want to check your code, then this branch will put you into a working state for this step: GitHub Repository - Step 1
Entities
A lot of stuff to get things drawn! Fortunately, that was a lot of the heavy lifting! Let’s now make our player a bit more useful and turn it into an Entity - by doing so we can easily abstract out every single other entity in our game.
Note: the overall goal is to end up with an array of entities that we can loop over and simply call their respective
update()anddraw()functions - no spaghetti mess of if statements! If you’ve a software engineering background then you might be familiar with the concept of having classes responsible for themselves. Essentially, we’re looking to partition out effort and responsibility.
Creating a base entity class
First, we’ll create a base entity class. Move over to entities.js and add the following:
class Entity {
  constructor(sprite, x, y, w, h) {
    this.sprite = sprite;
    this.x = x;
    this.y = y;
    this.w = w;
    this.h = h;
  }

  update() {}

  draw() {
    drawSprite(this.sprite, this.x, this.y);
  }
}
This gives us a base class that we can extend others off of. It’ll have a sprite variable, a position (x, y), and a size (w, h). Note that we could use vectors here (via the createVector call), however we’ll go simpler for now.
We’re also doubly-storing the size of the sprite given that they are square, however this approach is a bit more extensable if you end up with sprites that have non-square sizes (looking at you, dcss sprites).
Note: any generic functions that you want all entities to have should go in your base class. You can leave them empty if it is to be specialized by child classes (like the
updatefunction is). Note that thedrawfunction has code since all entities will have the same draw approach.
Create our child classes
We could have our player be an entity, however let’s move ahead and specialize. Here are the types of entities we’ll consider here (feel free to experiment/extrapolate!):
- An entity that can move (e.g., the player, monsters, NPCs)
- An entity that cannot move (e.g., an item, something in the environment, an NPC that is geo-locked)
Interestingly, we’re not going to get too crazy with our specializations. We could, but we’ll leave that to our component setup. (And, if we did it here we’d have a lot of refactoring to do, which is not really all that much fun). What we will do for deeper specializations is to equip each entity with a suite of components, making it a touch more data-driven.
So, let’s delineate our children - create a few sub-classes:
// an entity that can move
class MoveableEntity extends Entity {
  constructor(sprite, x, y, w, h, speed = 1.0) {
    super(sprite, x, y, w, h);
    this.speed = speed;
  }

  // make sure the move is valid before doing it!
  tryMove(move) {
    if (
      this.x + move.x < 0 ||
      this.x + this.w > width ||
      this.y + move.y < 0 ||
      this.y + this.h > height
    )
      return false;
    return true;
  }
}

// Our player class - this is a bit special as we'll do some one-off
// coding in here.
class Player extends MoveableEntity {
  constructor(x, y, w, h) {
    // fyi, this magic number should be defined in a lookup table!
    super("player", x, y, w, h, 12.0);
  }

  // handle player movement
  move(dir) {
    let next_move = { x: this.x, y: this.y };
    if (dir == "up") next_move.y -= this.speed;
    else if (dir == "down") next_move.y += this.speed;
    else if (dir == "left") next_move.x -= this.speed;
    else if (dir == "right") next_move.x += this.speed;
    else console.log("Movement not supported");

    if (this.tryMove(next_move)) {
      this.x = next_move.x;
      this.y = next_move.y;
    }

    this.x = constrain(this.x, 0, width - this.w);
    this.y = constrain(this.y, 0, height - this.h);
  }
}

// temporary entities - we'll modify/delete them later!
class Enemy extends MoveableEntity {
  constructor(sprite, x, y, w, h, speed) {
    super(sprite, x, y, w, h, speed);
  }

  // enemy AI
  update() {
    if (random() > 0.8) {
      let next_move = {
        x: this.x + random([-1, 0, 1]) * this.speed,
        y: this.y + random([-1, 0, 1]) * this.speed,
      };
      if (this.tryMove(next_move)) {
        this.x = next_move.x;
        this.y = next_move.y;
        this.x = constrain(this.x, 0, width - this.w);
        this.y = constrain(this.y, 0, height - this.h);
      }
    }
  }
}

// a bouncy friend
class DVD extends MoveableEntity {
  constructor(sprite, x, y, w, h, speed) {
    super(sprite, x, y, w, h, speed);
    this.vx = 1;
    this.vy = 1;
  }
  update() {
    let next_move = {
      x: this.x + this.speed * this.vx,
      y: this.y + this.speed * this.vy,
    };

    this.x = next_move.x;
    this.y = next_move.y;

    if (this.x > width - this.w || this.x < 0) this.vx *= -1;

    if (this.y > height - this.h || this.y < 0) this.vy *= -1;

    this.x = constrain(this.x, 0, width - this.w);
    this.y = constrain(this.y, 0, height - this.h);
  }
}

// a followey friend
class Follower extends MoveableEntity {
  constructor(sprite, x, y, w, h, speed, target) {
    super(sprite, x, y, w, h, speed);
    this.vx = 1;
    this.vy = 1;
    this.target = target;
  }
  update() {
    if (this.target == null) super.update();
    else {
      // calculate the distance to the player (our target),
      // normalize that vector, and then calculate our
      // new path by incorporating the speed and direction
      let my_v = createVector(this.x, this.y);
      let t_v = createVector(this.target.x, this.target.y);

      let direction = p5.Vector.sub(t_v, my_v);
      direction.normalize();
      direction.mult(this.speed);
      my_v.add(direction);

      this.x = my_v.x;
      this.y = my_v.y;
    }

    this.x = constrain(this.x, 0, width - this.w);
    this.y = constrain(this.y, 0, height - this.h);
  }
}
OK, we now have some specialized classes. We have a Player that will manage our player, a generic Enemy that will randomly jitter, a bouncing DVD logo, and something that follows the player around with a bit of vector math.
If you run it now, you should see nothing - that’s because we haven’t instantiated them yet.
First, let’s make sure the player still works. Replace your player creation code (in setup) with:
player = new Player(80, 80, SPRITE_SCALED, SPRITE_SCALED);
and in the draw function, replace the call to drawSprite('player' ...) with:
player.update();
player.draw();
and where you handle the keyboard:
  // enable continuous movement
  if (keyIsDown(LEFT_ARROW) || keyIsDown("a")) {
    player.move("left");
  }
  if (keyIsDown(RIGHT_ARROW) || keyIsDown("d")) {
    player.move("right");
  }
  if (keyIsDown(UP_ARROW) || keyIsDown("w")) {
    player.move("up");
  }
  if (keyIsDown(DOWN_ARROW) || keyIsDown("s")) {
    player.move("down");
  }
} // end of draw loop
We’re now deferring handling player movement to our child entity class. If you run it now it should look identical to before.
However, we had all those fun other classes to play with, so, let’s instantiate them! Back in sketch.js, add a list at the top that will hold our entities:
let entities = [];
Now, let’s show off how useful this can be. In setup at the bottom, create some things for the player to see, as well as to add the player to the list of entities:
  entities.push(player); // player is always our 0-th entity

  // create a few monsters
  choices = ["npc", "snake", "beholder"];
  for (let _ = 0; _ < 10; _++) {
    let e = new Enemy(
      random(choices),
      random(0, width - SPRITE_SCALED),
      random(0, height - SPRITE_SCALED),
      SPRITE_SCALED,
      SPRITE_SCALED,
      random(1.0, 5.0)
    );
    entities.push(e);
  }
} // end of setup loop
Now, remove the call to player.update() and player.draw() in the draw() function. Replace it with:
for (let e of entities) {
  e.update();
  e.draw();
}
All entities will be looped over and have their updates/draws deferred to their respective classes. Nice and clean in your main code.
Note: if you are allowing entities to die, then we’ll want to handle it a touch differently:
for (let i = entities.length - 1; i >= 0; i--) {
  let e = entities[i];
}
The reason why is that if we want to remove an entity from the list, then we’ll need to start at the end and work backwards. This is because iterating over the list in a forward direction would be problematic if entities disappear during the loop!
Add in the DVD bouncer and follower now as well in setup at the bottom:
  let d = new DVD("beholder", width / 2, height / 2, SPRITE_SCALED, SPRITE_SCALED, 2.0);
  entities.push(d);

  let f = new Follower("snake", 20, 20, SPRITE_SCALED, SPRITE_SCALED, 1.0, player);
  entities.push(f);
} // end of setup loop
No updates necessary to the draw loop because everything is handled! Time to move on to components now to give them some things to do.
If you ran into issues or want to check your code, then this branch will put you into a working state for this step: GitHub Repository - Step 2
Components
On to the Component part of ECS. This portion will give each of our entities a thing that has responsibility for itself. Essentially we’re avoiding the creation of sub-sub-sub classes for each specialization.
An easy example to think of is if something can be hurt or not in the game. Typically that means it gets health, defense, strength, etc. We could add that as a parameter to the MoveableEntity class, but then all moveable entities will have health. Not necessarily a bad thing if you want it, but what if its an item that can scurry around?
An easier way is to make all of that a Component - for example we could make a FighterComponent that has those attributes. Or, we could create an AI component that defines the behavior of how enemies move, follow, etc.
We’ll be removing all those special enemy entities and replacing them with components!
How is this useful? We’ll add a lookup table for components in our base entity class, and then we’ll check in its update call if it has a particular component. There are probably nicer ways of handling this, but we’ll add it as a dictionary.
Over to components.js -
Let’s create the base component class that all others will extend from:
class Component {
  constructor(key) {
    this.key = key;
  }
}
For now, we’ll keep this basic, since our components won’t have much overlap. However, if you go a bit crazy and add all kinds of components you’ll start to notice patterns, the same variables, etc. Those would go into your base class to prevent redundancy.
Let’s now add the FighterComponent to give our character and the enemies some abilities.
class FighterComponent extends Component {
  constructor(hp, def, str) {
    super('fighter');
    this.hp = hp;
    this.maxHP = hp;
    this.def = def;
    this.maxDef = def;
    this.str = str;
  }

  // returns the percentage of health remaining
  getPerc() {
    return this.hp / this.maxHP;
  }

  // damage the entity
  takeDamage(dmg) {
    this.hp -= dmg;

    if (this.hp <= 0) {
      this.hp = 0;
      this.die();
    }
  }

  // handle death - can delegate to the entity or handle here
  die() {
    console.log("oof");
  }
}
Ok, we now have a component! You should hopefully know what to do now - any entity that you want to be able to fight gets a FighterComponent. To do so we’ll need to add a place for them to go. In entities.js, add a new variable and helper function in the base Entity class:
class Entity {
  constructor(sprite, x, y, w, h) {
    ...
    this.bar_h = this.h * 0.2; // height of the HP bar
    this.components = {};
  }

  addComponent(c) {
    this.components[c.key] = c;
  }

  ...
}
This helper function is exceedingly sparse and does nothing if you accidentally try to add the same component more than once. You should protect it better with a polished program, but for now this will work. Just be careful with what you add.
Now, back over to sketch.js, add the new component to the Player (in the setup function, where you initially defined it):
player = new Player(80, 80, SPRITE_SCALED, SPRITE_SCALED);
player.addComponent(new FighterComponent(10, 1, 1));
entities.push(player);
Last, let’s go ahead and make use of the health bar and show the entity’s status in real time. Back in entities.js in the base Entity class, extend the draw function to check for the fighter component:
  draw() {
    drawSprite(this.sprite, this.x, this.y);

    // draw HP bar
    if ("fighter" in this.components) {
      let perc = this.components.fighter.getPerc();
      let x = this.x;
      let y = this.y - this.bar_h * 2;

      noStroke();
      fill("rgba(224,72,72,0.6)");
      rect(x, y, this.w, this.bar_h);

      let w = map(perc, 0.0, 1.0, 0, this.w - 2);
      fill("rgba(0,255,0, 0.6)");
      rect(x + 1, y + 1, w, this.bar_h - 2);
    }
  }

  takeDamage(dmg) {
    if ("fighter" in this.components) {
      this.components.fighter.takeDamage(dmg);
    }
  }
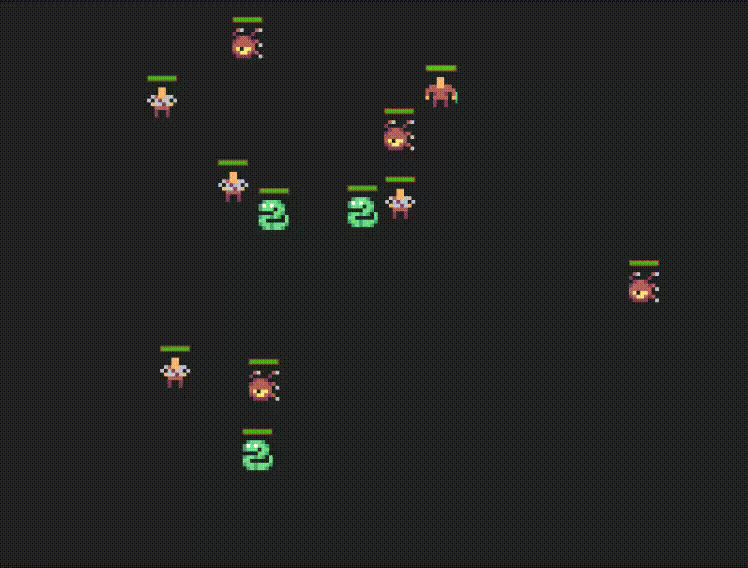
Here, we’re checking to see if the fighter key exists, and if so, draw a health bar using the percentage of the entity’s health and the size of its sprite. Essentially, drawing a red background with a green rectangle that is scaled to the percentage (the map function takes a value and maps it from one range to another).
We also added in the takeDamage function, which gives us an entity-level function to call to hurt an entity. Again, probably better ways to do this but we have a check to see if the component exists, and if so, call its related function.
If you want to add a little debugging check, we can mess with the HP on the player pretty easily (and the idea would be you would extend this to a collision detection of some sort):
In
sketch.js(at the bottom):function keyPressed() { if (key == '1') player.takeDamage(1); // hurt if (key == '2') player.takeDamage(-1); // heal }
We will leave fighting/hitting each other for another time unfortunately. However, let’s go ahead and define some AI components that will replace all the custom entities. There are a couple of options where we could go - create an AIComponent class and then extend it further (kind of like we did earlier), or create a single AIComponent and delegate the logic to itself. Since our AI is only going to be based on movement we’ll do the latter, however if there was to be more delineation it would be better to have additional subclasses.
So, back to components.js:
class AIComponent extends Component {
  constructor(type, entity, vx = 0, vy = 0, target = null) {
    super("AI");
    this.entity = entity; // reference to parent
    this.type = type;

    this.vx = vx; // follower and DVD logo
    this.vy = vy;

    this.target = target; // for the follower
  }

  update() {
    // random mover
    if (this.type == "random") {
      if (random() > 0.8) {
        let next_move = {
          x: this.entity.x + random([-1, 0, 1]) * this.entity.speed,
          y: this.entity.y + random([-1, 0, 1]) * this.entity.speed,
        };
        if (this.entity.tryMove(next_move)) {
          this.entity.x = next_move.x;
          this.entity.y = next_move.y;
        }
      }

      // bouncing dvd logo
    } else if (this.type == "DVD") {
      let next_move = {
        x: this.entity.x + this.entity.speed * this.vx,
        y: this.entity.y + this.entity.speed * this.vy,
      };
      this.entity.x = next_move.x;
      this.entity.y = next_move.y;

      if (this.entity.x > width - this.entity.w || this.entity.x < 0)
        this.vx *= -1;

      if (this.entity.y > height - this.entity.h || this.entity.y < 0)
        this.vy *= -1;

      // follow a target
    } else if (this.type == "follow") {
      if (this.target != null) {
        let my_v = createVector(this.entity.x, this.entity.y);
        let t_v = createVector(this.target.x, this.target.y);

        let direction = p5.Vector.sub(t_v, my_v);
        direction.normalize();
        direction.mult(this.entity.speed);
        my_v.add(direction);

        this.entity.x = my_v.x;
        this.entity.y = my_v.y;
      }

      if (this.entity.x > width - this.entity.w || this.entity.x < 0)
        this.vx *= -1;

      if (this.entity.y > height - this.entity.h || this.entity.y < 0)
        this.vy *= -1;
    }
    // else do nothing

    // stay in bounds
    this.entity.x = constrain(this.entity.x, 0, width - this.entity.w);
    this.entity.y = constrain(this.entity.y, 0, height - this.entity.h);
  }
}
You’ll note that we took all the special update code from the subclasses and moved it to this particular component. We’re also passing in the parent entity so that we can have a reference to it. Looks like a lot, but that’s all the code from the specific entity subclasses.
All positions/sizes are now replaced by
this.entity.<param>as those are owned by the parent entity class now.
Ok, time to wire it up. Since we’re going to allow any entity to have an AI, we’ll check it in the base class. However, you’ll need to update the Enemy class as well! First, remove the update function from the Enemy class.
If you want your enemies or other entities to take advantage of the
AIComponentyou’ll need to check for it within that class’updatefunction - the base class’updatedoesn’t run if a child class has an instance of it.
Update the base Entity class update function:
class Entity {
  ...
  update() {
    if ("AI" in this.components) {
      this.components.AI.update();
    }
  }
  ...
}
Now add the components within sketch.js - replace the code where you’re instantiating all the non-player entities (in setup) with this (basically the same, just now adding components):
  choices = ["npc", "snake", "beholder"];
  for (let _ = 0; _ < 10; _++) {
    let e = new Enemy(
      random(choices),
      random(0, width - SPRITE_SCALED),
      random(0, height - SPRITE_SCALED),
      SPRITE_SCALED,
      SPRITE_SCALED,
      random(1.0, 5.0)
    );
    e.addComponent(new FighterComponent(10, 1, 1));
    e.addComponent(new AIComponent('random', e));

    // console.log(e)
    entities.push(e);
  }

  let d = new Enemy("beholder", width / 2, height / 2, SPRITE_SCALED, SPRITE_SCALED, 2.0);
  d.addComponent(new FighterComponent(10, 1, 1));
  d.addComponent(new AIComponent('DVD', d, 1, 1));
  entities.push(d);

  let f = new Enemy("snake", 40, 40, SPRITE_SCALED, SPRITE_SCALED, 2.0);
  f.addComponent(new FighterComponent(10, 1, 1));
  f.addComponent(new AIComponent('follow', f, 1, 1, player));
  entities.push(f);
} // end of setup
Last, remove all your Enemy subclasses (i.e., DVD, Follower) – they’re not needed anymore! Leave the Enemy one though.
Your game should look the same as before, however now it is more data-driven! You can now add as many different reusable components as you want!
If you ran into issues or want to check your code, then this branch will put you into a working state for this step: GitHub Repository - Step 3
Next steps
This is a taste of what you can do. A few things:
- p5js is canonically slow for JavaScript games as it makes some choices in terms of rendering performance. It is for teaching and not necessarily production games. Manually draw to the
canvaswith straight JavaScript or use a framework like PhaserJS to optimize your game.- Check the Performance tab in your browser to profile! Also, p5 optimization suggestions
-
Add gameplay! We’ve essentially created a 2D walking simulator.
-
Wire in Tiled maps! I’ve not tried it, but a lot of 2D games use the Tiled Editor for setting up maps, obstacles, etc. p5.tiledmap
- Check out the other p5js libraries! There are a ton of things you can do with it!
- There is an ECS library as well that I’ve never tried, but it also includes a Scene Manager, which is nice (alternatively, just use a state machine to manage that yourself).
- Make a roguelike game in Godot! The SelinaDev tutorial is a nice introduction to Godot (and more imporantly for this, ECS).