Table of contents
- Lab 1 - Getting Started
Lab 1 - Getting Started
Given that our Bluefruits are unavailable at the moment, we’re going to run through the simulator and get up and running with the general concepts of Lab 1. This can all be accessed via a browser.
This is the link to the simulator: https://maker.makecode.com/
Lab Signoff
For each lab, I will have some minimal things you need to do before you leave for the day. This will be part of your participation grade, so don’t forget to do it!
Before you leave for the day, (minimally) show me:
- The MakeCode simulator running the printing/LED example (the first one)
- LEDs blinking in a separate project (the second one).
Reference Guide
If you find yourself looking for a command or clarification on syntax, here is the reference guide.
Saving and Loading
Saving and loading projects is handled via images. You click ‘Save’ on the bottom, it downloads an image, and that is your save file. You can load projects by … uploading the image (you have to go back to the projects list).
Note that the editor will save them to your local storage, however that won’t persist across devices (unless if you setup Git repositories…).
Install CircuitPython and Libraries
Well, this simulator actually uses block-based programming (or JavaScript, or Python) to handle things, and no installation is necessary. Unfortunately with the quick turnaround needed to do this lab I am not as familiar with how Adafruit set up their JavaScript framework, the Python implementation is not a one-to-one comparison, so we’re going to go block-based for now.
If you ever have used Scratch you’ll feel right at home. If not, no worries.
Hello World
The on start block is the equivalent of a setup function in Arduino and the forever block is the equivalent of the loop function. This doesn’t really exist in CircuitPython, but think of it this way:
on start/setuponly runs once, at the start of a program (typically to initialize things)forever/loopruns for ever, and is the equivalent of putting awhile Trueloop in your code.
Let’s do some basic things. Create a new project, call it YourLastName-CIS373-Lab1. We’ll be modifying it throughout this lab.
Next, pick the Bluefruit as the board. The simulator can simulate nearly all Adafruit boards, which is nice. Let’s use the one we should be using in class.
You should see this:
It seems that we don’t get a serial console via the simulator, so if we want to print debugging messages we’ll have to use the console. You also need to get into debug mode to see them (and exit debug mode if you want to modify the program).
So, print hello world. Drag a console log block into the on start block and add some text. Something fun like Hello world or cheeky like I wish that we all had hardware we could use this on.
Doubly interesting - you can write programs in the simulator, download the UF2 file, and drag it onto your eventual Circuit Playground devices (essentially, flashing it like you would have done with the CircuitPython file).
Our first program
In the real lab, we’d be importing libraries, getting time and memory usage going, etc. Since a lot of that will be obfuscated, let’s just follow the basics. In Python we’d be printing out something every second, then ending at 10 seconds. We can recreate that in Makecode
This is the original:
from time import sleep

seconds = 0
done = False
while not done:
    print("Hello world - {0} seconds.".format(seconds))
    seconds += 1
    sleep(1)

    if seconds > 10:
        done = True
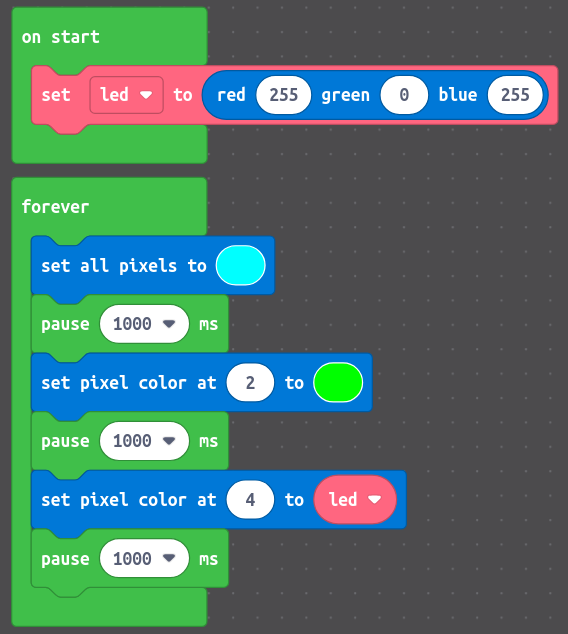
Now, let’s do that in the simulator. We’ll add in a notification as well - we can have the lights turn green when done.
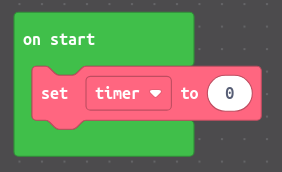
First, create a variable in on start - timer = 0. It should look like this.
I had to search for ‘true’ to find the Boolean variable to move into the variable assignment.
You might be wondering about that done variable. Since we have the forever block we don’t need to create our own. We’ll just bail out of the loop once we’re ready.
Now, let’s increment our variable and delay the program so it doesn’t run too fast. If you’ve programmed before this might be slightly confusing, but we are essentially going to be doing a timer = timer + 1 type of call.
We also want to have our program sleep slightly so that we aren’t overwhelming the device. Confusingly, the delay is named pause (there is a wait block as well - but that is waiting for an event, not pausing the program).
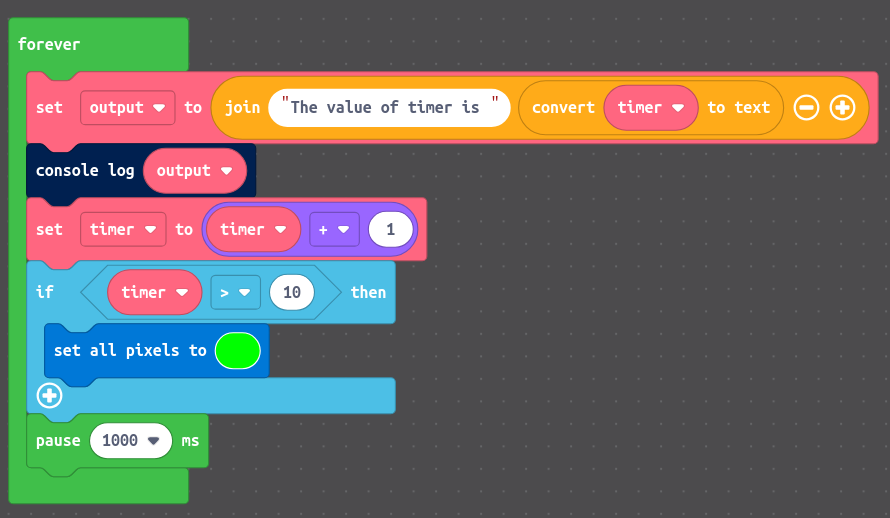
It should look like this at this point:

If you pop open the debugger you should see data being printed.
Now, if you want to have ‘better’ output you might want to do string concatenation. It is a bit of a reach since you have to be very verbose, but it should look like this:

Last step, let’s update the forever loop so that the program has an end point.
Note: I can’t find a way to fully break out of the forever loop, so we will just allow it to go forever but will make sure it doesn’t “do anything” when it shouldn’t.
Let’s add a conditional - first we’ll check if the timer variable is greater than 10, and if so, we’ll turn the lights green. Otherwise, we’ll do our usual printing.
Add an if statement to make it look like this:
Should work fine, however it still prints forever. Move the printing statements into an else block (you’ll need to grab the if-else block):
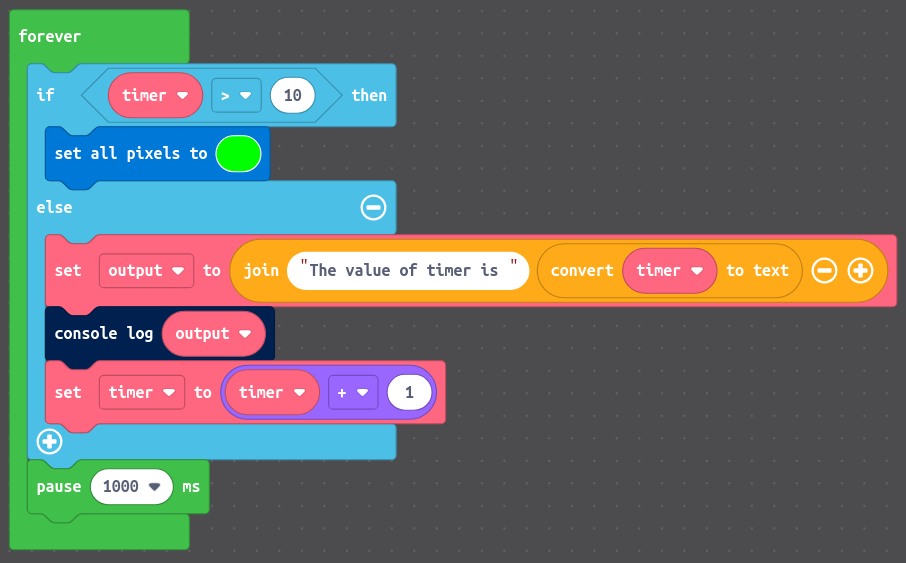
Not bad, we now have the concepts of logic, variable setting and printing, and setting LEDs.
Take a screenshot of your working simulation, including the console output and the LEDs on and save it for your lab report.
Make those LEDs blink (with randomness)
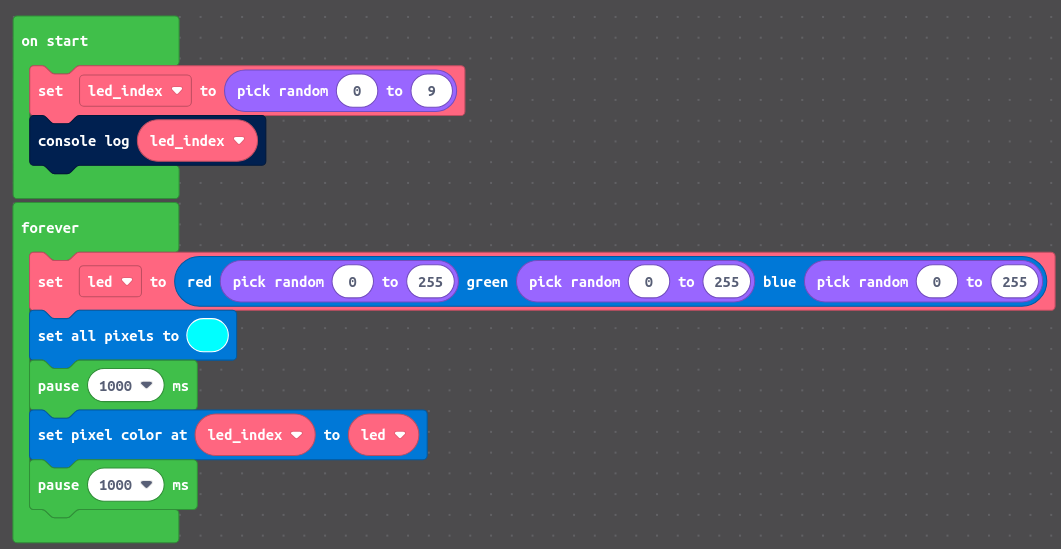
Now, let’s make them blink. Create a new project as we’ll be starting fresh.
Skipping the Neopixel (the LEDs) instrumentation for now, this brings us to the concept of RGB values for color. Essentially, 0 is black, 255 is white, and the values in between are how dark or light you want that particular value.
Our Neopixels use a tuple for RGB - (R, G, B). For instance, setting an LED to (255, 0, 255) will make it hot pink (or, the magic color).
Try setting a single pixel to a specific color. Remember, our LEDs are indexed between 0 and 9, and each has a color specified as a 3-tuple. The block-based language allows you to directly pick a color or to manually set it:
Now, let’s have a randomly-selected LED blink a random color every second, ensure we clear out the prior colors.
Try to do the following steps - I’ll give the final reference but try on your own:
Create an additional variable
led_indexto hold our randomly-selected index (keep theledvariable as we’ll use that too).Add a random number block that is
pick random 0 to 9and copy and paste it into theled_indexvariable.Add a random number block that is a
pick random 0 to 255, copy and paste it into each of the RGB fields inled, and drag the initialization into the top of the forever loop. This will give a new value each iteration rather than only one.
What you should see is a randomly-selected LED show a randomly selected color, where the colors are cleared out each loop to “refresh” the LED ring.
The random number block is inclusive, so doing random between 0 and 9 will yield a value on [0, 9].
Here is the hint.
Take a screenshot of your working simulation, including the console output and the LEDs on and save it for your lab report.
Handle button presses
We’ve done a lot in this introductory material, but the goal is to get you up and running as soon as possible. The last piece for this module is to handle button presses. The Bluefruit has two buttons built into the board - A and B.
Normally we’d need to specify if an input is pull down or pull up, but we’ll save that for the real hardware (you do have a homework question on it though…). Pull-up or pull-down.
We’re using the built-in buttons here (button A and button B). You can wire/clip a button to any of the open ports you see ringing your device for additional inputs! In a future lab we may even use some non-traditional methods of input.
Make your project look like this (creating a new project):
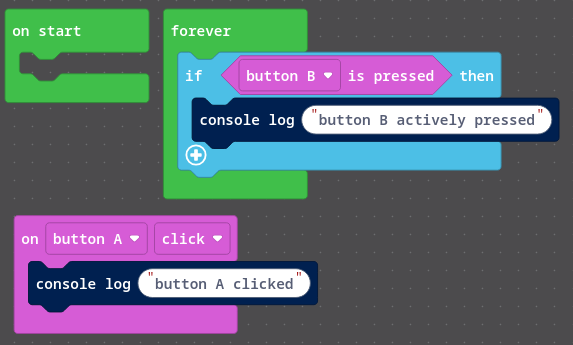
Notice the difference when you click each button in the simulator! What do you notice?
The block that is on button A click is a callback and will run whatever is within the block when the button is pressed. The other block (if button B is pressed) runs within the forever loop and is checked every time, regardless.
Putting it together - Color Cycler
At this point let’s do a little cleanup. Time for a new project and for the one you’ll be submitting! Name it yourlastname-CIS373-HW1.1
What our goals are:
Let’s plan this out a bit - we want to (1) define an array of colors, (2) set one of our buttons to cycle through the colors, and (3) set the other button to turn the lights on and off.
Note: I’ll give you pseudo-code for most of this, and you have to translate it into blocks.
(1) Define an array of colors
Let’s define an array of colors and its current index.
First up, define the available colors - remember we have the range of [0, 255] for each color component. Feel free to add additional colors as well.
RED = (255, 0, 0)
GREEN = (0, 255, 0)
BLUE = (0, 0, 255)
WHITE = (255, 255, 255)
PINK = (255, 0, 255)
BLACK = (0, 0, 0)
An RGB color code chart is quite helpful if you want to figure out what colors to use! https://www.rapidtables.com/web/color/RGB_Color.html
We’ll also need our index value:
color_index = 0
And our array (note we’re leaving off BLACK as we’ll use that as our clear color):
colors = [RED, GREEN, BLUE, WHITE, PINK]
For us, the array will look like this (search for array to find the correct block).

The simulator has pre-defined colors that we can use as well, like you see above. Up to you if you want to use the RGB or the pre-defined ones.
Now, any time you want to set your colors you can use human-readable values. For example, LED0 can be set to hot pink by writing pixels[0] = PINK or pixels[0] = colors[4]
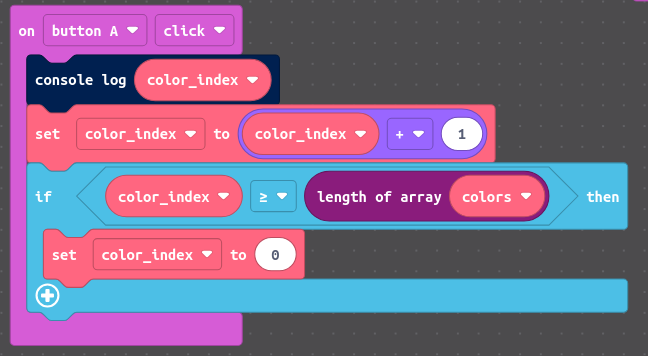
(2) Set one button (button A) to cycle through colors
Now, let’s go ahead and use button A to cycle through our colors array! What we’re going to do is update our new color index variable each time that button is pressed, and ensure we check if it goes out of range (you wouldn’t want to access an array element that doesn’t exist, would you? ಠ_ಠ).
Inside your if btnA.value conditional:
# Cycle through colors
if btnA.value:
    color_index += 1
    if color_index > len(colors):
        color_index = 0
By defining our check in this fashion, we could make our colors array as large as possible without needing to rewrite this code. So now, we naturally need to do something with color_index, right?
For reference, the length of array block gives you the equivalent of len. It should look like this:
For ease of use, we’re going to set the LED colors every loop cycle. A better way would be to turn this into a function and only set them when we do some event, but we’ll save that for a future assignment.
For now, in the forever loop, we want to set all pixels to colors[color_index].
You should see your LED ring start out as RED and cycle through each color every time you press button A.
The equivalent blocks call is set all pixels to, and accessing the exact index is colors get value at color_index.
(3) Set one button (button B) to turn lights on and off
This one is pretty straightforward. We’re going to define a flag, or a variable that is boolean in nature, to define our light state.
In your variable initialization area, add the following:
lights_on = True # flag to enable/disable lights
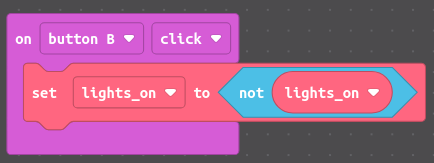
And modify the button B press code:
# Toggle light state
lights_on = not lights_on
This one is mildly tricky, so:
And then modify the light showing code:
# Set our LED colors and display them, if enabled
if lights_on:
    set all pixels to colors[color_index]
else:
    set all pixels to BLACK
What is happening here is that we’re setting our values, and if the B button has been pressed we’re setting the color to BLACK (or (0, 0, 0)), which is off for LEDs.
How do we submit the files?
You’re going to need to submit your saved project image to Blackboard as well as a lab manual. I’m going to test your program by running it in my browser.
If you are struggling please reach out!
Homework
See Blackboard for the homework questions. You have to turn your code in as well!