Table of contents
Lab 2.1 - Simulated Rainbows and Capacitive Touch and Shakes!
We’re still waiting on that whole supply chain to rectify itself, so once again to the Makecode simulator we go. Today we’re going to make more light shows, but this time with capacitive touch, multiple buttons, and shakes.
The eventual Python lab will use rainbowio for a library, but we’ll come back to that.
For reference, here are the details of the Adafruit CircuitPython NeoPixel. It is super nifty and makes programming LEDs ridiculously easy.
Lab Signoff
Before you leave for the day, (minimally) show me:
button Aplaying a rainbow andbutton Bclearing the LEDs.- The LED array turning red when you shake the device.
First - new project (and back up your old projects)
Don’t forget to backup your old Lab 1 images somewhere safe! Start a new project for this lab.
And now, a rainbow
This is pretty easy and we don’t need to worry about any external libraries or anything like that.
We’re going to setup some basic behaviors so that we know when things are “working” – basically when we’re debugging boards like this it’ll be a lot easier to see LEDs doing things than it is to hook up a debugger and look at the console.
(We’ll be checking the console as well).
First, let’s consider “ON” to be a built-in LED animation and “OFF” to have all the LEDs set to black (remember, (0,0,0) in RGB).
On our devices and most NeoPixels, setting the LEDs to black will actually just turn them off.
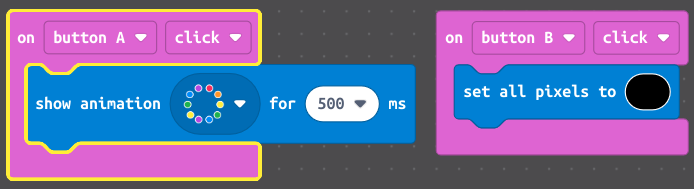
Let’s go back what we learned in our first lab and setup an event. Add a callback handler for button A and button B, respectively.
In button A have it play a rainbow animation for 500ms, and in button B set all LEDs to black.
Here’s the hint if you need help.
There are some other fun animation styles if you click the drop down. You can also define your own with some programming and timing!
Back up and running, nice work. Let’s explore some other input options.
Interim variable
We’re now going to insert a variable that is going to handle the state of what is displayed in the forever loop. Essentially, we’re going to have our different inputs make different colors appear.
Leave the button A and button B callbacks as is, for now.
Define a new variable called button_state and leave it as an int. Typically for what I’m going to have you do we’d define an enum, however that would entail defining an array for blocks and that is going to be more annoying than it is worth.
Enums serve as a nice protection against accidental variable settings, however. Plus, they protect against changing variable states.
We’re going to have button_state serve as the following (in pseudo-code):
0 = OFF
1 = RED
2 = GREEN
3 = PINK
4 = PURPLE
So, when it is set to 0, the LEDs should be off (unless if you pressed button A, naturally).
Here’s the hint.
Couple of notes - we’re going to be using callbacks to influence button_state, so all our “main” logic for what it is doing will be separate. Unless if we’re changing things up we probably won’t touch the forever loop much after this!
Additionally, you can quickly test out if your logic works by setting button_state to the different values within setup.
What happens if you set button_state to 5 in setup? Is this a good or bad thing?
Shakey shakey
First, we’ll take advantage of the accelerometer on the device. Note that this behavior most likely relies on a library that is checking to see if the measured acceleration values quickly change so that you know it is “shaking.”
If we were doing this in Python you’d either need to use that library or manually sample the sensor and track it over a second or so.
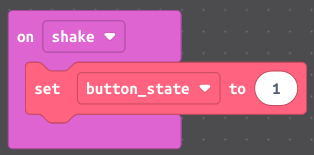
Now, search for “shake” in the list (it’ll be an on shake block). If you click the drop down you can see all the different options you have for this block (i.e., if you don’t want a pure “shake” behavior).
Within that block, set button_state to 1. So, when we shake it (the option should become available in the simulator after you add that block) the colors should turn red (and stay red because we don’t ever change it).
Try to make it look like this.
An interlude!
Add a block within the button B callback to set button_state to 0, since we never change that. This gives us the ability to “reset” our program state without turning the device off.
And also, more buttons!
Initially I wanted to highlight the switch that is available, however for whatever reason I cannot get the simulator to make it work. Seems like a browser glitch, at least for me.
Just be aware you also have a switch to use as input - it is pretty small and easily overlooked.
However, we have a couple of other interesting possibilities! First, we have the A+B button option - this would be the same as pressing both A and B at the same time.
Not easy to do with a mouse cursor…so the simulator devs put in an A+B button on the board (you won’t see this on the real board).

Add another normal button callback like you did in the beginning, except this time set it to A+B. Inside that function set button_state to be 2.
Capacitive-ish touch
We’ll, ahem, touch on this when we have our board fully working. Similar to the switch I can’t find a way to get a proper “touch” event to fire in the simulator.
HOWEVER, something interesting happens. Add another button callback, however this time set it for button A1. In that event, set button_state to be 3.
Here’s some info on capacitive touch - it will prove quite interesting once we get into our synthesizer lab!
Pick another of the inputs and have button_state be set to 4 to finish up our color picker.
You might notice…
If you happen to see your button B or button A+B callbacks acting wonky, that is wholly a simulator thing. It seems to forget at times which callbacks to use. You can try moving them to external buttons (the A0-A7) to get the functionality back. You’ll be doing that anyway in the next section, just something I noticed.
Also, you only seem to be able to do a maximum of 6 capacitive touch inputs.
The interesting thing is if you download this code to your device it will work just fine (aside from the needing to wire up external buttons part).
For your homework:
Based on these inputs, do the following:
button Ashould play either therainboworcometanimation, depending on a variable setting.button A0should set the LEDs to OFF.button A1should set the LEDs to RED.button A2should set the LEDs to GREEN.button A3should set the LEDs to PINK.button A4should set the LEDs to PURPLE.button A7should toggle the animation state played whenbutton Ais pressed.- A
shakeevent should set the LEDs to OFF.
For each event, write an appropriate message to the console.